Blindata Settings
Blindata is an ERP system.
It includes functionality for sales leads, quotations, sales ordering, bill of materials, stock control, purchase ordering and invoicing, contact management, sales analysis, online ordering and accounting.
There is also functionality for bar code scanning, production scheduling and employee time management.
The software also links to the most popular accounting systems in the UK, including Sage 50 and Quickbooks.
Additionally, it integrates with major carriers’ systems, postcode lookup software.
There are also tools for importing orders from retail web sites and for sending and receiving orders to and from other Blindata users.
Ball Software has also been at the forefront of providing online ordering services to manufacturers and this has resulted in over 1000 businesses submitting orders electronically on a regular basis.
Introduction
This manual is designed to assist in the set-up and use of the Blindata software system by a window blind manufacturing company.
It describes all aspects of setting up the software as well as day-to-day use of the system. A separate document is available that
describes all the reports that are produced by the system.
System and Business Considerations
Prior to setting up the system, a business should concentrate on the most important aspects of its business. Companies involved in
the window blind business can be divided into three separate categories: trade, retail and contract. Many companies will do all three
but will concentrate on one particular category.
It is a useful exercise to look at existing manual and computerized systems. How are prices calculated? Is everything done manually?
Are there existing spreadsheets set up for price tables? Who will be responsible for the setting up and running of the software?
Is there a link to an accounts package? What sort of stationery is to be used for labels, works orders and invoices?
If the business is mainly involved in manufacturing, how is manufacturing documentation to be produced?
Are dimensions to be in imperial
or metric? Are the dimensions to be in size entered or actual blind size?
How is stock to be handled? Are cost prices to be properly monitored?
There are many questions to be answered before the software is implemented, all of which are relevant to the running of a business.
Set Up
The following is a guide to setting up the software.
Please note that before you start setting up the basic functions of the system, you must fill Blindata Desktop with the necessary data.
Therefore before you set up anything on the system, you should compile a list of the following:
- Blind types are all the different ranges of products you manufacture and sell.
This should include products you buy in from other manufacturers and sell on.
It should also include all the necessary information you require to make the blinds.
For example, for a vertical blind, you may need to know about headrail colour, bunch, controls and cord colour.
These options will be different for each blind type.
In our experience, this is an extremely important exercise and requires a commitment by management to ensure that the exercise is carried out properly.
- Price tables for all blind types.
If you have these on a spreadsheet, they should be formatted in the same way as the Blindata price table
spreadsheet format.
- Suppliers. If you have these on a spreadsheet, they can be imported to Blindata.
- Nominal codes. If you use Sage Line 50 or another accounting system, you must make sure that the correct nominal codes can be applied.
It is important that this *structure is understood properly. If in any doubt, contact your accountant.
- Stock items. This is a potentially big subject, as it contains all fabrics and components that are used in the manufacture of blinds.
If you intend to use the stock control system, it will also mean supplying all the formulae that are used to manufacture blinds.
- Manufacturing data. Slat tables (or pitch for Venetians), ladder web spacing (for Venetians) number of vanes for verticals (both single and
split bunch), rules about joins in roller blinds, type of headrail system used for verticals etc. This information tends to be specific to each
manufacturer and specialist knowledge is required.
- Customers. If you are a Sage Line 50 user, this data can be imported directly from the Sage data.
Alternatively, it can be set up on a spreadsheet and imported to the Customer's table.
There are other pieces of information that are useful to have prior to system setup: do you have reps, use areas, sources of advertising,
currency types, departments etc.
If you have this information on a spreadsheet, it should be formatted in the same way as the ‘Blindata Import Master Spreadsheet’ format and then imported into Blindata Desktop.
The ‘Blindata Import Master Spreadsheet’ can be found in the Blindata program > Help > Import Files > Samples Import Files and here.
And the import from the Excel routine can be found in 'Administration > Import from Excel':
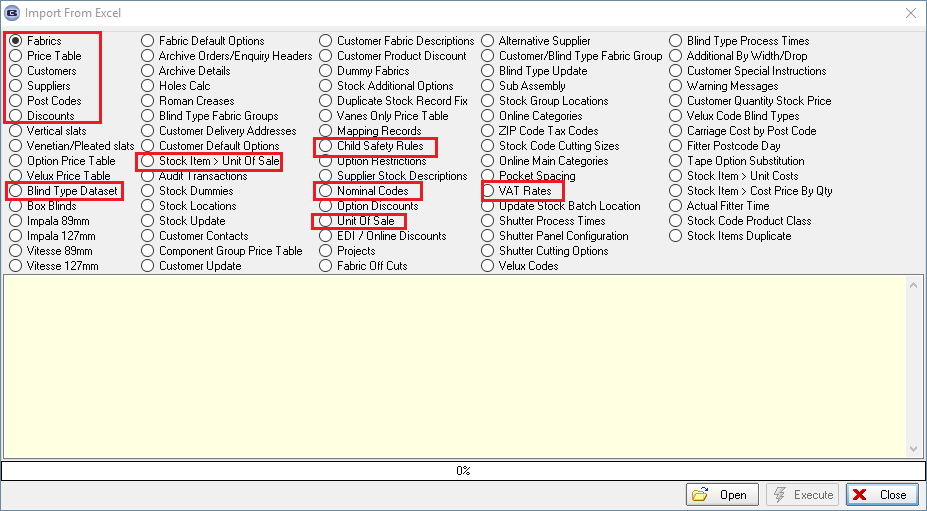
Let's start the setup.
Please note that a lot of the records that make up the drop-down lists in the Blindata tabs are located in the ‘Administration > System Tables’.
Therefore, we will return to this system table quite often.
It is also necessary to follow the specific sequence in the setting process (as described here), since all Blindata tabs depend on each other.
Nominal Codes.
If you use Sage Line 50 or another accounting system, you must make sure that the correct nominal codes can be applied.
It is important that this structure is understood properly.
If in any doubt, contact your accountant.
The ‘Nominal Codes’ are entered in the ‘Administration > Nominal Codes’ tab:

The 'Nominal Codes' should be filled in in customer, supplier, stock item, and blind type records.
Suppliers/Vendors.
The company that provides blind types and products (components for blind detail) to your manufacturing company.
If you have ‘Supplier’ information on a spreadsheet, it can be imported to Blindata with the ‘Blindata Import Master Spreadsheet’ or using the 'Administration > Account Utilities' (if you are using Sage or QuickBooks).
The supplier records can also be added manually, please see below:

Blind Types.
This is one of the main tabs that contain blind details which can be made in production and sold to the customers (blind types that are marked as 'Stock Control').
And blind details are resold from a supplier/vendor (blind types that are marked as 'Bought In').
Here you need to add the name of the blind types, their options and option choices (stock items) i.e., details that are included in the finished product that can be despatched to the customer.
There is a setting for default details which are always included in the finished product and additional details that depend on the option choices that were selected in the blind detail.
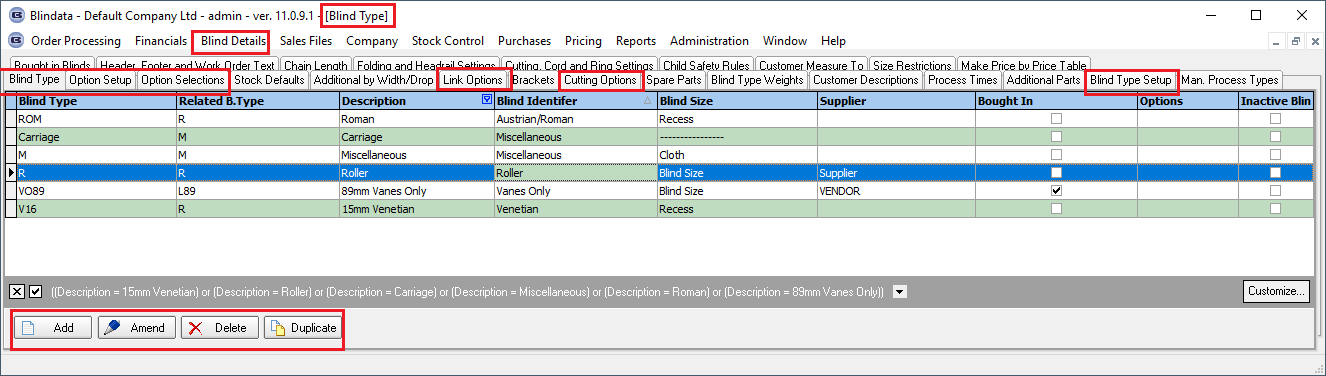

'Blind Type' should mark as 'Stock Control' if you are manufacturing these blinds and not buying them from a supplier/vendor.
'Option Config' should be ticked in order to apply the 'Link Option' rules.
'Link Options' is a possibility to restrict the options that appear in the blind detail entry (sales order) according to other options that have been selected.
If you need to calculate the cutting size, please tick the 'Parameterized Cutting Options'.
If 'Child Safety Disabled' is false, then you need to add child safety rules in the 'Blind Details > Blind Type > Child Safety Rules' tab.
Manufacturing data.
Slat tables (or pitch for Venetians), ladder web spacing (for Venetians) number of vanes for verticals (both single and split bunch),
rules about joins in roller blinds, type of headrail system used for verticals etc.
This information tends to be specific to each manufacturer and specialist knowledge is required.
Please check the detailed information on how to set up and info that explains the difference between blind type settings in the How To Set Up Blind Type section.
Stock items.
This is a potentially big subject, as it contains all fabrics and components that are used in the manufacture of blinds.
If you intend to use the stock control system, it will also mean supplying all the formulae that are used to manufacture blinds.
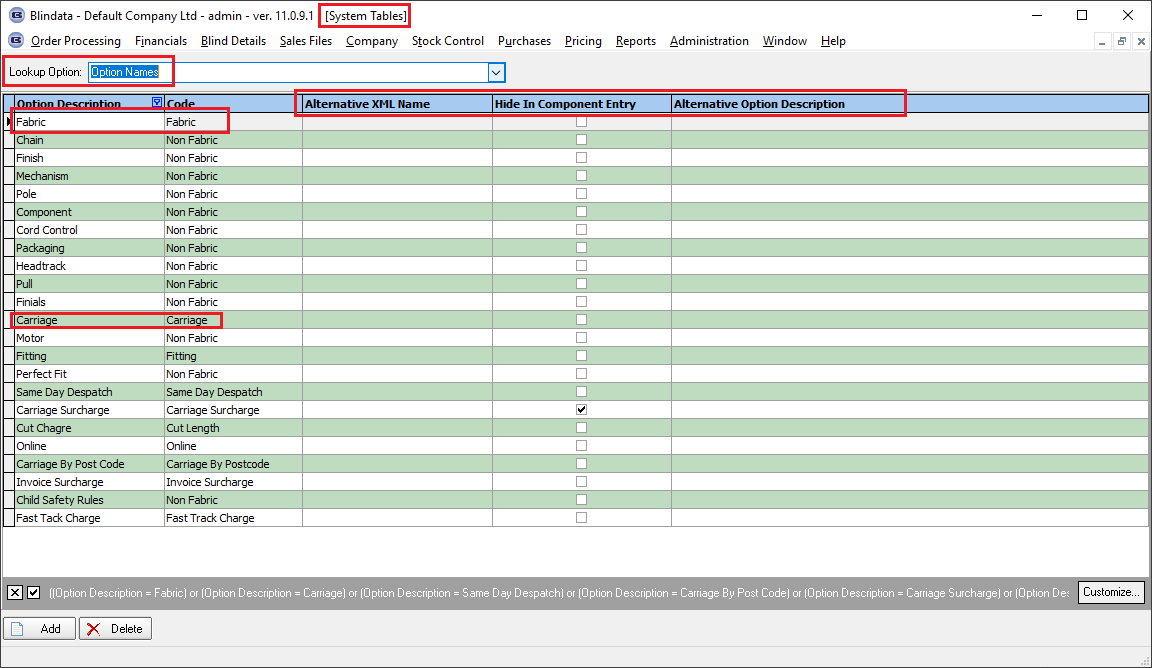
The ‘Option Name’ system tab is a tab where you enter the name of the option that is included in the blind manufacture process.
But also, here you should list a special functionality that you are planning to use, for example, ‘Carriage’, ‘Invoice Surcharge’, ‘Fitting’ etc.
In the beginning, you need to have a list of the fabrics (stock items), option names (headrail colour, bunch, controls and cord colour etc) and
option choices (stock items) for the option name (for example option is headrail colour, and the option choice is red, blue etc) and the carriage.
All option lines that are included in the blind manufacture process should have a ‘Non Fabric’ code.
The ‘Fabric’ = ‘Fabric’ code.
The ‘Carriage’ = ‘Carriage’ code.
When the option name is added, it’s time to create option choices and fabrics (stock items).
This is quite massive work and we recommend using an import from Excel routine (Fabric tab).
The ‘Blindata Import Master Spreadsheet’ can be found in the Blindata program > Help > Import Files > Samples Import Files and here.
And the import from the Excel routine can be found in 'Administration > Import from Excel'.
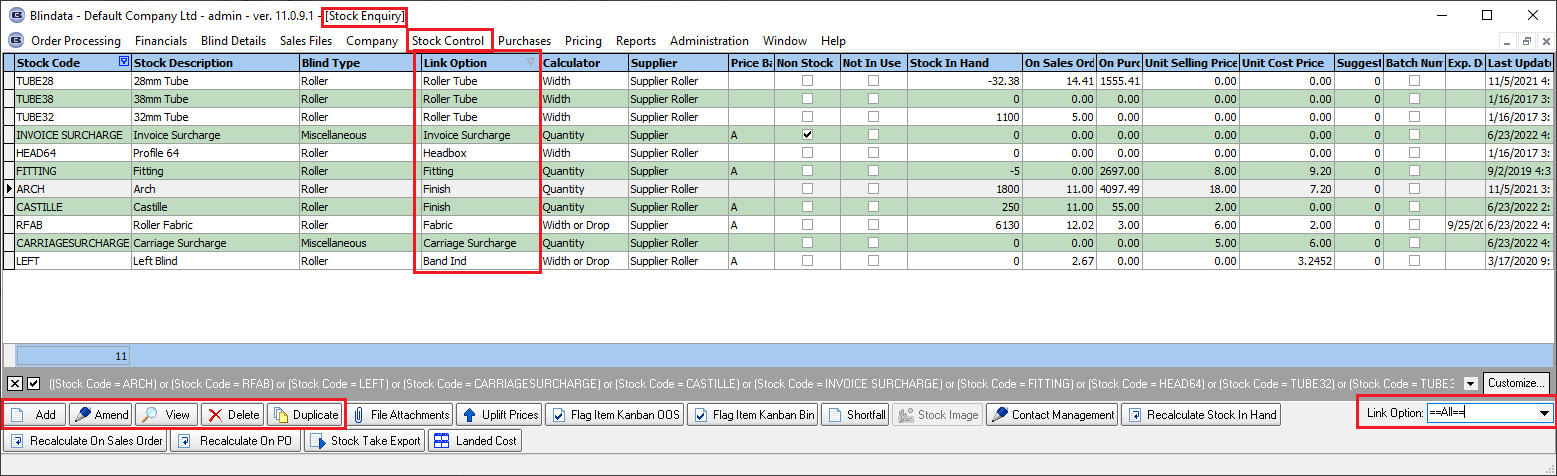
When all fabrics and option choices (stock items) are imported, it's time to link the option choices to a blind type:
Make sure that the stock item has a blind type linked to it in the ‘Stock Item > Product Blind Type’ tab:
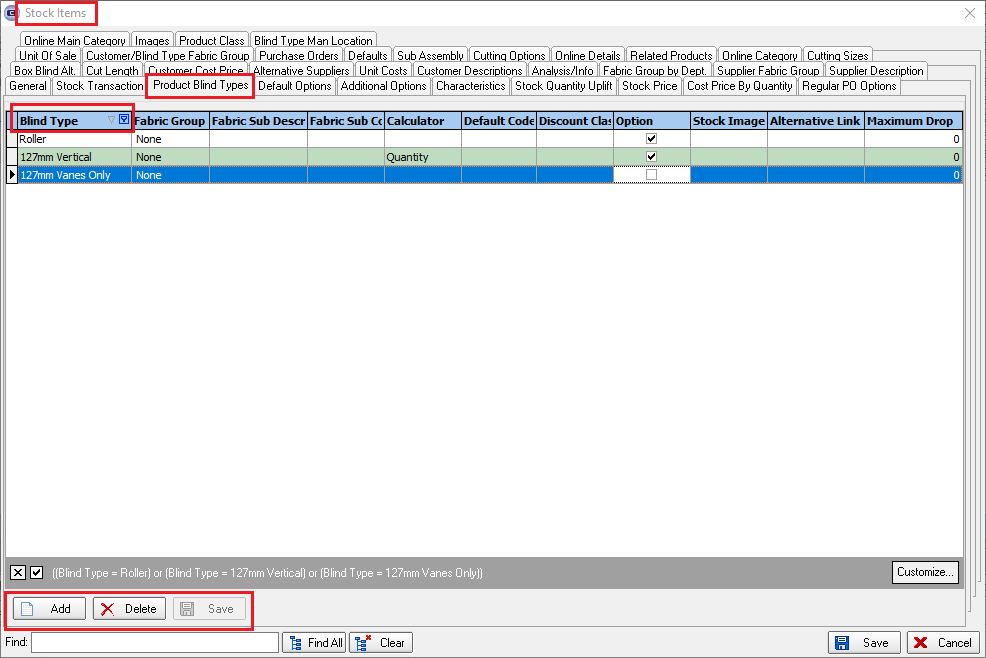
If the stock item is an option choice in the blind type and not the ‘Fabric’ then the ‘Option’ flag should be ticked.
‘Fabric Group’ and ‘Calculator’ is used in the price calculation (explained below in the price section).
Then add option and option choices to the blind type:

Price.
We need to enter the cost price of the product and the selling price for customers.
There can be scenarios when the customer price is different from customer to customer.
Also, the selling price can be ‘Trade’ or ‘Retail’ (‘Excluding Tax’ and ‘Including Tax’).
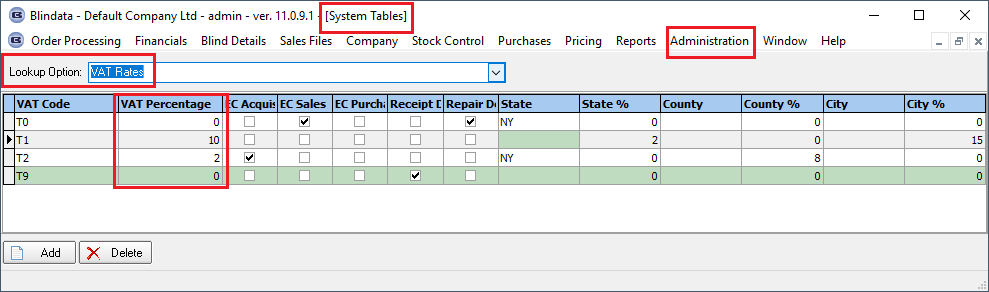
VAT Rate (Tax) should be entered in the ‘VAT Rates’ system table:
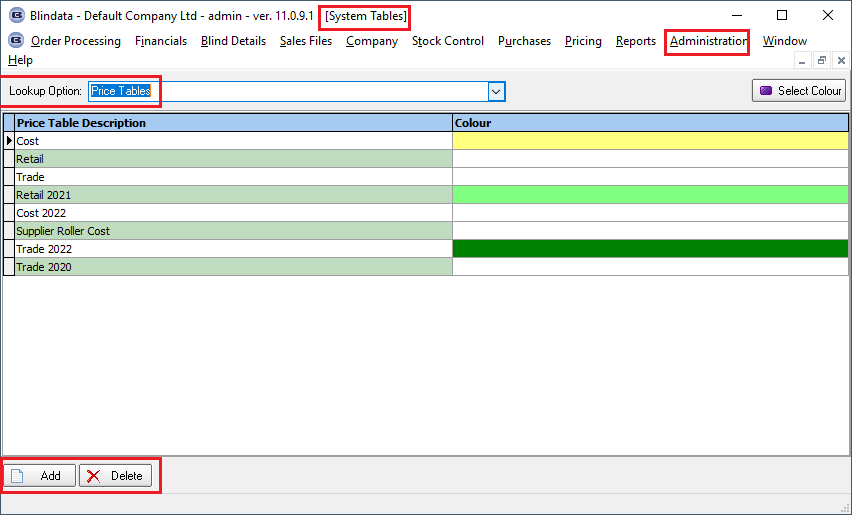
The name of the price tables is entered in the ‘Price Tables’ system table:
Now, we need to add an actual price for the blind type and the option price.
This can be done with the import from Excel routine.
The ‘Blindata Import Master Spreadsheet’ can be found in the Blindata program > Help > Import Files > Samples Import Files and here.
And the import from the Excel routine can be found in 'Administration > Import from Excel'.
But also, can be done manually in the ‘Pricing > Price Table Enquiry’:

And the option price:

Customers.
If you are a Sage Line 50 user, this data can be imported directly from the Sage data.
Alternatively, it can be set up on a spreadsheet and imported to the Customers' table.
The ‘Blindata Import Master Spreadsheet’ can be found in the Blindata program > Help > Import Files > Samples Import Files and here.
And the import from the Excel routine can be found in 'Administration > Import from Excel'.
The most important tabs are:
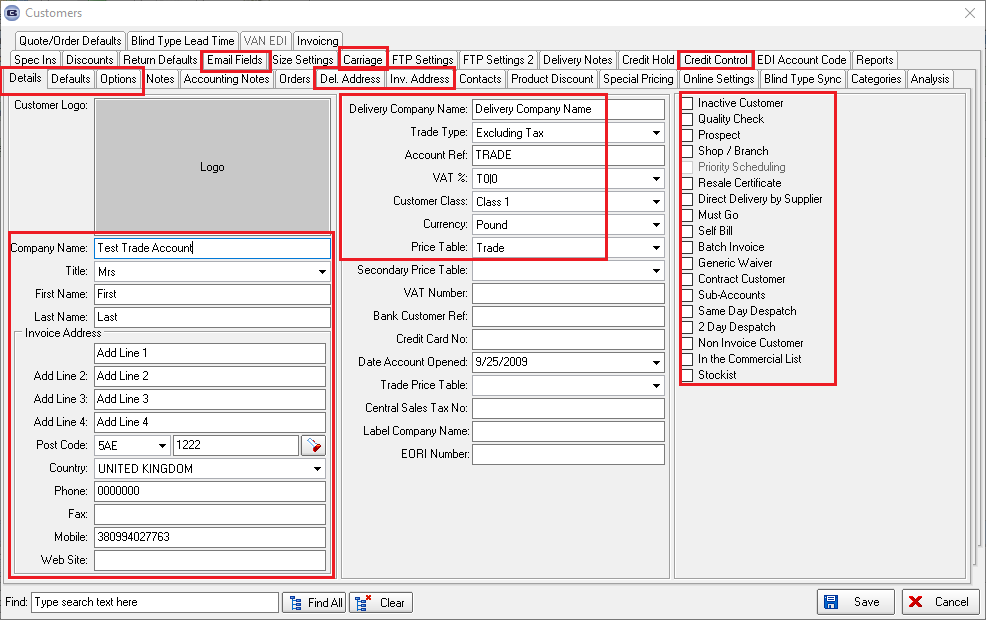
- Details/ Defaults/ Options.
Customer Information, VAT/TAX, ‘Price Table’, ‘Trade Type’, ‘Currency’, ‘Area’, ‘Despatch Method’, ‘Delivery Days’, ‘Nominal Codes’, ‘Metric/Imperial’ etc.
- Delivery and Invoice Address.
The addresses where the goods/blinds/components should be delivered and where the invoice should be sent to.
- Credit Control.
This determines if the customer can be credited or proforma.
- Email Fields.
Here you need to enter a default customer email and check the email parameters that are exists
- Carriage.
Here you need to select a carriage type, a free-of-charge carriage day (if applicable), and configure the auto carriage to sales order functionality.
Users
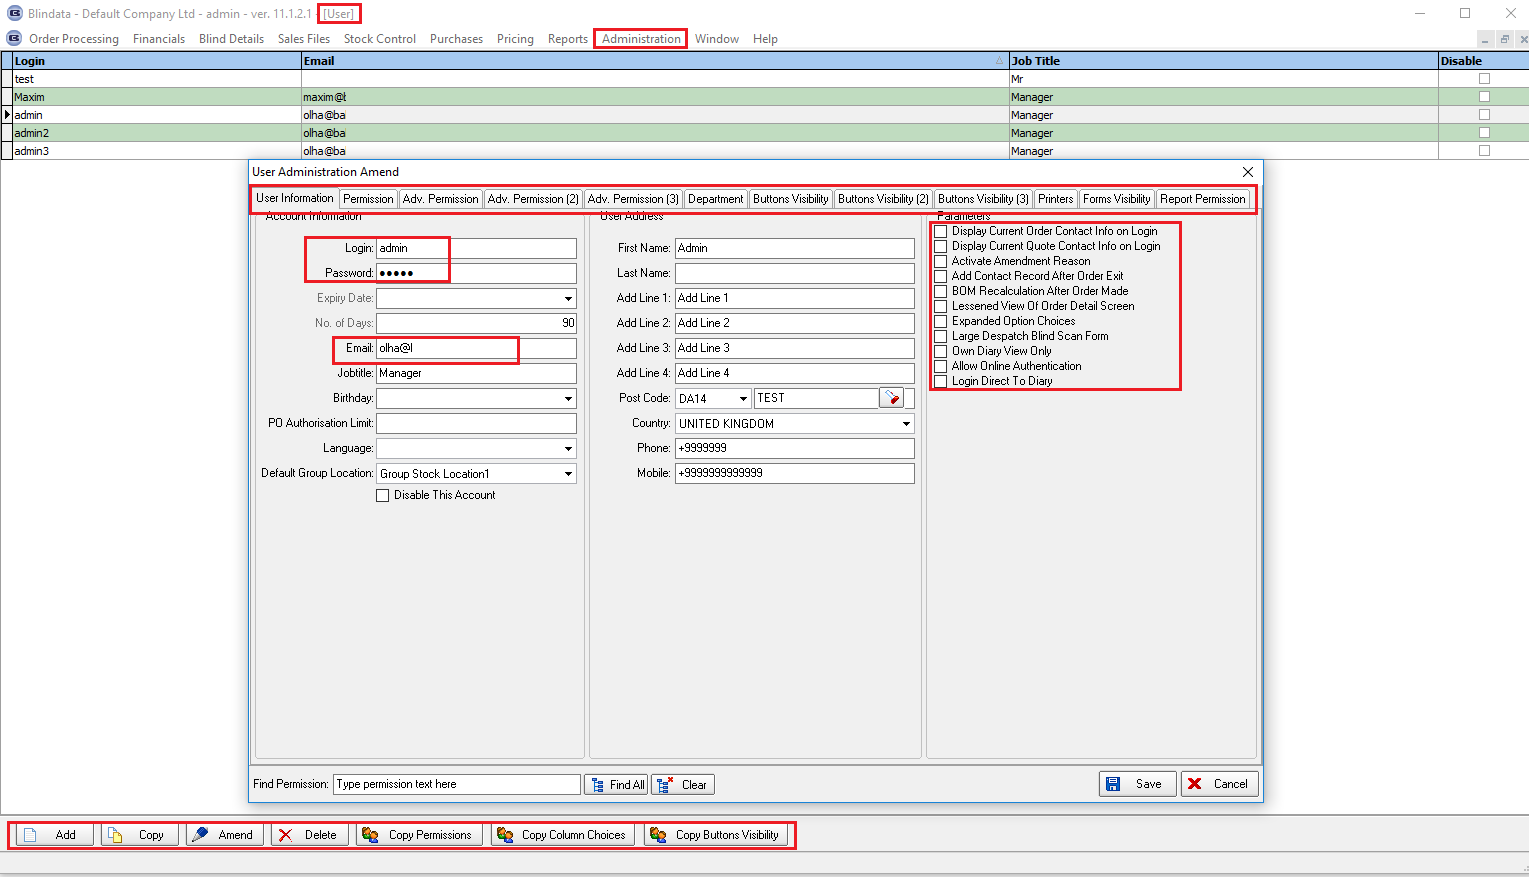
There is an 'Administration > Users' tab where we need to list all users that will have access to the Blindata Desktop.
All users have permissions and visibility parameters, where you can control their access to certain tabs and forms in Blindata.
There is an 'Administration > Employees' where we need to list all employees who are working in the company.
For example, fitters, reps, remote agents, 'Production' and 'Despatch' workers and so on.

There are other pieces of information that are useful to have prior to system setup: do you have reps, use areas, sources of advertising, currency types, departments, etc.
Once all this information has been gathered, the following should be set up in Blindata:
1. Enter company details (Administration > Company Details).
2. Enter parameters (Administration > Parameters).
3. Enter all relevant system tables (Administration > System Tables > All).
The most important tables are area codes, code letters, department, employees, fabric group, measure to, nominal codes, option names, post codes, and price tables.
4. Enter fabrics and components (or preferably use preloaded fabrics that come with the system).
If stock is being used, set up stock calculators for all products.
5. Enter blind types along with stock defaults and option descriptions.
6. Enter price tables (or preferably import from spreadsheets, if possible).
7. Enter customers (or import automatically, if running Sage Line 50 or Quickbooks).
8. Check that all reporting documentation is satisfactory.
Blindata workflow can be divided into processes.
If you want to use the diary and sales leads then the following steps must be taken, otherwise 2.
- Enter Sales Lead
- Assign sales lead to an appointment time and Rep employee
- Print/send appointment
- Convert appointment to quotation/order or mark it as 'rejected'
- Create a fitting appointment if relevant at this stage
If you want to enter the quotation before the sales order then the following steps must be taken, otherwise 3.
2. Quotations
- Enter the quotation manually or import the quotation through the XML import
- Or converted quotation from the sales lead
- Print/email quotation
- Convert quotation to a sales order
3. Sales Orders
- Enter order header information
- Enter order details (blind types, components, carriage line, additional charges)
- Adjust totals if necessary
- Enter receipts if necessary
- Print/send order acknowledgements
If there are not enough products to complete the sales order, create a purchase order (4), if not relevant go to 5.
- Create bought in (blind type) or regular (component) purchase orders from sales orders
- Print/send purchase document to the supplier
- Send an XML file to the supplier (if your supplier uses the Blindata program)
- Receive a purchase order and make a purchase product delivered in Blindata (from 'On Purchase Order' to a ' Stock in Hand')
5. Sales Order Processing
- Print the works orders and/or labels (order status changes to 'Order Printed')
- Give works orders and/or labels to employees so they could produce the blind detail (order status might be changed to 'Work In Progress')
- Produce blinds and make sales order 'Order Manufactured'
- Create fitting appointments if necessary
- Despatch the sales order and print delivery dockets (order status changes to 'Despatched')
- Create Invoice
- Print Invoice
- Post Invoice
Printing Works Orders and Labels
These can either be printed out individually or in batches.
To print works orders individually, click on ‘Preview Works Order’ on the Orders form.
It is now possible to print preview works orders (from the order amend enquiry form) but not have the status of the order changed from ‘Order Entered’ to ‘Order Printed’.
The status of the order only changes to ‘Order Printed’ if the works order is actually printed.
This can be set with a new parameter in Administration > Parameters, called ‘Flag previewed order as printed’.
To print labels, click on ‘Preview Labels’ > Print. In this case, the order status will change from 'Order Entered' to 'Order Printed'.
Order Processing > Production Documentation
To print the works orders and labels in batches, go to Order Processing > Production Documentation.
Work In Progress
If ‘Enable Work In Progress’ is switched on in Administration > Parameters, then the blinds/orders must be flagged as ‘Work In progress’ before Manufacturing.
This can be done using the ‘Work In progress’ buttons in either the main ‘Orders’ form or in Order Processing > Order Enquiry.
Manufacturing
Order can be marked as manufactured by one of the following methods:
‘Order Made’ button in Order Processing > Orders.
‘Blind Made’ or ‘Order Made’ button in Order Processing > Order Enquiry.
There is a way to use Scanning Barcodes process in Order Processing > Order Enquiry.
Despatch
Orders can be delivered by clicking on ‘Despatch’ in Order Processing > orders or in Order Processing > Order Enquiry.
There is a way to use Scanning Barcodes process in Order Processing > Order Enquiry.
Fitting and Delivery Before Invoice
There is an option to mark a sales order as 'Delivered' before changing it to the 'Invoice Created'.
Please check the 'Fitting and Delivery Before Invoice' flag in the 'Despatch Method' that is selected for the sales order and/or customer.
Creating Invoices
Before creating an invoice, please check the Accounting Parameters section where you can find all the needed information about the accounting and parameters that are available in Blindata.
Invoices can be created individually by clicking on ‘Create Invoice’ in Order Processing > Orders.
They can also be created in batch mode in Financials > Create Invoices.
This will create invoices from all selected orders that have a status of ‘Despatched’.
Printing Invoices
This can be done individually by using ‘Print Invoice’ in Order Processing > Orders, or by printing in batches using Financials > Invoice Batch print.
The last option will print all invoices that have not yet been printed.
Posting Invoices
Invoices can be posted individually by clicking on ‘Post Invoice’ in Order Processing > Orders.
They can also be posted in batch mode in Financials > Post Invoices.
Currently, Blindata supports Blindata Accounting, Sage, Maxton, QuickBooks, Xero, Lakeview, Mertex, Peachtree, Sage 200 Espi, Sage 300 and SAP Accounting program.
This means that you can post invoices directly into the accounting program.
There are quite a few different reports that collect data that you can run to check the progress of sales, production, and stock control.
For this, please open 'Stock Control > Reports' and 'Reports'.
Blindata is a full ERP program that covers a lot of functionalities.
Therefore, we created a manual of the most useful functionalities, please check the Blindata Help.
But if you don't find the answer to your question feel free to create a new support element as described here.
And will help you as soon as possible.
Now you're ready to enter orders!